Wednesday, January 4, 2012

101 Winter Riding Tips

This is a list of winter riding tips and favorite products compiled by our staff here at Village Cycle Center. Most of us ride everyday of the year, and the winter is no exception. Each person donated some of their knowledge, experience, and in some cases humor to help you through the cold days ahead. They are in no specific order of importance. They are all just there for you to use as you will. Or don't use. It is a free internets and you can do what you like. You can tell your friends to use them. Or not. You could not use them and tell your friends to use them. But that would be up to you. What ever you do, just keep riding your bike.

1. Gore-Tex Socks. Waterproof and windproof happiness for your feet. For the years before I got winter specific footwear, Gore-Tex socks were an everyday item.
2. Keep a journal. Not sure what to wear with the ever changing weather? Keep track of what you wear each day, what the weather is like, and how you felt riding. Cold, warm, too hot, just right. Then when you can't figure out what to wear, look back to your own data based on how you like to ride.
3. Maintain your bike. The winter is extremely tough on your bike commuting in the city. Road grime, water, salt, and all sorts of nasty builds up on your bike quick. A daily wipe off of the frame and parts followed up with some lubrication will save you loads of money in prematurely worn and/or rusted out parts.
4. Give yourself extra time. Almost everywhere you go will take more time than usual. Giving yourself extra time will save you on stress and over heating working too hard getting somewhere.
5. Pay attention to the obstructions in your route before it snows. So when they are covered by a slush puddle, you know what is coming.
6. Grow a beard. Best balaclava ever. If you can't do this. Gore Bike Wear makes an excellent balaclava that doesn't fog up your glasses.
7. Goggles. Goggles rock when the snow is blowing and it's super cold. Racing cross has raised my level of suffer a bit. So my goggles only come out on the worst of days, but they are there, and I use them.
8. Bar Mitts. If your hands get cold easy, these bad dogs are the bomb! Made for flat or drop bars, you can use your spring gloves in these on the coldest of days. If you live where 0 is common, you may need some thicker gloves.
9. Eat more. You burn more calories in the winter. The same distance you rode in the summer will take more energy to cover when moving through snow.
10. Layers.
11. Lotion. It puts the lotion on its skin, or it gets all dry and crackly.
Studded tires add some traction.
12. Studded tires. They are not necessary, but they do work well. You will move slower and work a bit harder, but you will not end up on your butt in a cold slush puddle because you slipped on ice. They also build confidence when riding on nasty days. 
13. Fenders. Fenders not only help keep you dry, they help keep you and the bike clean.
14. Minotaur fur lined magic helmet. Keeps you magically warm.
An amateur sketch of the mythical Minotaur Fur Lined Magic Helmet.
15. Glare resistant eye wear. When there is snow on the ground and the sun is out. It can be blinding. Tinted glasses or Tifosi Fototec eye wear works well to adapt to changing light levels.
Gore Bike Wear Active Shell
16. Gore Bike Wear Tool jacket for men and Fusion jacket for women. Full Windstopper jacket with a soft and luxurious inside lining. This is my daily jacket almost all winter. When it gets really cold, you can add a Gore Tex Active Shell jacket over the top for an outer layer.
17. Lights. Lots of lights. Bright lights. Even during the day. The Blackburn Flea is a good light and is rechargeable so you are not constantly replacing batteries.
18. Watch out for manhole covers and drain grates. Very slippery when wet.
19. Train tracks are also slippery. Here is a little guide on dealing with them when wet.
20. It takes longer to get ready to go places. Plan for that. Do it.
21. Cotton is not your friend. It will make you sweat, and you will be cold.
22. Slow down while riding. Especially turning. Black ice will strike. Like a freaking ice ninja waiting for you.
23. Try a little lower tire pressure for better grip.
24. Watch out for alleyways. They have snow piles around them. And sometimes there is a car trying to come out it without getting stuck.
25. Be prepared for the post ride ice and slush melting off your bike when you come in. Towels, card board or boot mats works to catch the stuff.
26. Don't forget to grease your seat post. You should also have your bearing points like hubs and headsets checked and greased often and as needed. Once before and once after winter will work for most people.
27. Warming packs for hands and feet.
28. Wear a helmet.
29. If it is too cold to ride the whole way, you can take the train half way and bike the rest. It is still faster and you get to ride.
30. Plastic bags inside your shoes if you are on a thin budget. They work for blocking wind and water. But they also do not breathe, and your foot may sweat, a lot. Gore Tex socks if possible.
31. Make sure your base layer is tucked in. You lose quite a bit of heat through there.
32. A higher cadence will keep you warmer.
33. Wear more than one hat. Layers work on your head too.
34. Layer work for gloves too.
35. Riding in the drops (if applicable), reduces windchill.
36. Wrap-around glasses keep the wind out of your eyes better.
37. Run a lower gear ratio in the winter for better torque.
38. Reflective material & stickers.
39. Watch out for black ice at night.
40. Be ready for surprises.
Sidi Diablo GTX
41. Salmon brake pads. Not the fish, the color. The softer compound brakes better in colder weather.
42. Don't Panic.
43. Sidi Diablo GTX. They have a Gore Tex sock built in with some nice insulation. Warm and dry feet.
44. A death grip on the handlebar is not necessary. Relax. A loose, yet secure grip, will result in a less arduous ride.
45. Wider tires have more traction.
46. Feel good about yourself when you ride 5 miles when it is colder then 10 degrees.
47. Keep reminding yourself that "Man (or Woman!) Against Nature" is one of the classic conflicts.
48. Silk long underwear makes a good, inexpensive base layer. It breathes and the chicks dig it.
49. Army surplus stores are good for cool looking sturdy outer wear that's reasonably priced.
50. Something around your neck does an excellent job of sealing in heat. The Gore Bike Wear Power Beany is the bomb.
51. Get used to it: Good gear isn't cheap, and cheap gear isn't good.
52. Occasionally yell "Rabble Rabble Rabble" as you ride. It will make you feel better.
53. Take the "L" once in a while. It will remind you why you ride a bike in the winter.
54. Enjoy the looks you get from drivers and pedestrians.
55. Carry extra gloves of different weights in your bag.
56. Learn to get your lights on and off you bike and lock it up without taking off your gloves.
57. Take an Emergen "C" every day.
58. L.L. Bean cold weather boots keep feet warm and dry.
59. Frame saver! Frame saver! Frame saver! (if you have a steel frame)
60.Think about the revolutionary war soldiers at Valley Forge leaving bloody footprints in the snow. It will make you feel better.
61. Keep reminding yourself that riding is fun!
62. Take your coffee or hot cocoa with you. The hot deliciousness will keep you warm while you ride. The Barista works well to hold your mug on your handlebar.
63. Use Sport Wash with your technical gear. You spent some good money on your apparel. Help it perform and last longer by using a wash that doesn't fill the fabrics with softeners or perfumes. If you don't have Sport Wash, use half the amount of detergent needed.
64. Apply a light coating of Tri-Flow on your frame and parts to prevent build up of salt & grime. Be careful not to get it on your brakes. And if you do, use Clean Streak to clean off the braking surfaces.
65. Invest in Gore Sealed Cable systems. Your cables are sealed away from the environment and work well all winter without much maintenance.
66. Stainless steel Whipperman chain prevents corrosion.
67. Carry a self sealing CO2 kit for quick flat fixes when it is cold and wet. Then change the flat when you are warm at home.
68. In a pinch you can use newspaper for an added layer inside your jacket.
69. When around tall buildings and ice is falling, don't look up. Unless you don't have a helmet on. Then you might as well see what is about to fall on your head.
70. Do not lick your bike frame when it is cold. Even if they triple dog dare you.
71. Topeak Modular Java Cage holds almost every type of mug.
72. Use the flashing mode on your lights. The batteries last longer and you are more noticeable.
73. Use the Brooks proofide on the top and bottom of your leather saddle to protect against salt and grime.
74. Always use a saddle protector. (Brooks saddles)
75. Wear thermal cycling tights or thick leggings over regular hosiery to stay warm while riding, then quickly remove to look nice when you reach your destination.
76. Layer a wool sweater under a waterproof shell for extra warmth on extra cold days that can still match your outfit underneath.
77. A nice wool scarf or pashmina works to cover your face and keep your neck warm when it's chilly, but not cold enough for a balaclava.
78. Carry a plastic bag in your purse or backpack to put dirty winter riding clothes in once you get to your destination.
79. Use your brakes evenly when slippery.
80. Be careful on bridges. Walk around them if you feel the urge. Falling on them is quite painful.
81. Brandy in your water bottle may seem like a good idea, but it's not.
82. Wiggle your toes by extending them up on the top of your pedal stroke, and curling them on the down stroke. If your toes start to become painfully cold, STOP! Jump around, dance, or do jumping jacks to get the blood flowing into your extremities.
83. To keep fingers warm, don't just bend them to wiggle. Spread your fingers out, jazz-hands style, to get more blood pumping through your fingers.
84. Take time to enjoy your surroundings. Riding a bike lets you see the city from a different point of view then most people. So when the snow is falling and the city is quiet, enjoy it!
85. Remember, just like the Honey Badger, people who ride all winter are bad ass.
86. Check air pressure in your tires often. Getting a flat from over or under inflation sucks. It's basically your own fault you are now freezing your hands fixing it.
87. Sometimes the hardest part is getting on the bike. You sit inside looking at the pile of gear you have to put on and how miserable it will be. But you cowboy up and start rolling, and realize it's not that bad. And being on the bus is far worse.
88. Sometimes it is miserable. Remember it is your choice. What ever your motivation. No one is making you do this.
89. Just because you are working harder than anyone else on the street, doesn't mean you can break more rules than anyone else.
90. If the hat keeps you from wearing your helmet. It is not a good hat.
91. It is all mind over matter. If you don't mind, it don't matter.
92. Be prepared. Think about how long you will be riding and if it may get colder before you ride home. Bring an extra layer just in case.
93. Carry something for quick energy like a food or candy bar. Getting weak can come quick when burning loads of calories.
94. Keep an eternal spring in your heart.
95. Your bike should not live outside.
96. Good excuse for men to wear tights.
97. Embrocation! With glitter!
98. HTFU.
99. Remove Gore Balaclava before into bank.
100. Eat lots of clementines. Really handy for Vitamin C and making new friends.
101. Have a great water proof bag. Mission Workshop makes some of our favorites.


Glitter Legs! Now With More Sparkle!


This New Year, I spent it racing. Racing cross at the Chicago Cross Cup's New Years Resolution. Man was it fun. Being a special New Year race, I decided to bust out the embro and fancy it up with glitter. This time I came prepared with all three levels of DZ Nuts InHeat and dishsoap to wash the stuff off when I was done. Becky raced first, and at the start of her race it was sunny and 47 degrees. So some medium temp InHeat it was. With a boat load of glitter. Red and silver. Everything was going fine until during the race before mine, the temp dropped 20 degrees and I was now wishing for the high heat InHeat. It seems there is a time and a place for the hot stuff, and it was now. But too late for that. It is race time. We got staged by our cyclocross.com points, which I have very little of, so I was in back. I kinda like the back. I get to pass more people. Those folks in the front usually are faster than me.


30 seconds...

Go!

The start is down pavement (I like this about UCI races), around the cart path and onto the golf course. Yes, we are racing on a golf course. Fast, flat, and with all the rain and temperatures staying above freezing, very muddy. We tore the up this course really good like. Some huge mud pits formed around the bike pit and continued to grow as dirty bikes got power washed. Mud is fun. But as I learned a race ago, Red cassettes suck in the mud. And I forgot to swtich mine out. So by the second lap, I was down to two usable gears in the back. My granny gear, and 7. Other than that I could switch in front. For most of the course it was doable. But for the pavement it was time to stand and deliver the big ring and 7 to not get passed. This was becoming more and more easier for me, seeing as I quit smoking and could now actually breathe while I was racing. Hot damn! What a difference oxygen makes.

Get up, stand up. Stand up on your bike.


And for the first time racing all season. I didn't get lapped by those fast dudes. My last race (Afterglow) Barry Wicks & Super Fast SRAM Guy got me right before the finish. I was a lap down, but it looked like I came in 3rd. I'll take that.

Bill Draper takes badass pictures. Check out his work.


I love cross. Looking forward to next season already.

Tuesday, January 3, 2012

Super Sweet Slo-Mo New Year’s Resolution Video

Super Sweet Slo-Mo New Year’s Resolution Video: Kyle Bainter sent this little gem our way, and as he accurately described his video to us, “no story, no purpose, just beautiful slow motion cyclocross footage…” See the video below, and go back and read the race report and see the photos from Day 2 of the women’s and men’s races.

Thursday, December 29, 2011

Bicycle Helmet 101

Everyone should wear a helmet.

Let me rephrase that.

Everyone should wear a helmet that fits correctly, is not damaged, and less than 5 years old.


The basics are, as a helmet becomes more expensive, generally, they get lighter, have less contact to the head, and have more venting.

Bontrager Helmet Retention System
Each company has there own style of retention system to hold the helmet on your head.
They all have a strap and buckle to make sure it doesn't get knocked off your head during an impact, but most of the nicer helmets will also use a retention system to caress your noogin and fit around the back of the head to hold it in place more securely. 


 The helmet fit story also varies between companies. The shape or mold they use to design there helmets around are slightly different.
Giro Helmet Retention System
For example, if you have a round head, a Bell helmet would fit you better than a Giro helmet. Giro helmet fit you better if your head is slightly oval. To find the helmet that fits you best, you will need to try a few on. When you are doing so, make sure the straps are not twisted inside the helmet before you put it on. Once on your head, align the front of the helmet so it is parallel to the ground. Not on the back of your head pointing up.


Most cycling related impacts are frontal. Mountain bike helmets will provide more protection in the back than a road helmet due to the nature of off road cycling. Sometimes you fall backwards.

 
Back of a road (left) and mountain helmet (right). Notice the mountain helmet has more protection.

Now for venting.

We carry a Bell product, I call the Bell Crock Pot.
Bell Crock Pot
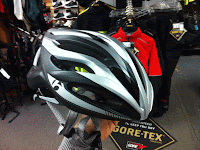
The Bell Crock Pot does its job. It straps on your head with the traditional strap & buckle system. It also has some holes on the top for steam to escape. It does not vent well. You can see from the above picture there is no light inside those holes. And if there is no light, there is no wind coming through. In the summer while wearing this bad boy, you will find out why I call it a crock pot.

Moving up the scale we carry the Bontrager Solstice. This is our #1 selling helmet.
Bontrager Solstice helmets ready to go.
These helmets step up the game with a real helmet retention system as well as the strap and buckle. All the helmets we carry from here on up also have retention systems and straps.
Bontrager Solstice vents
Now we have some light creeping through there. This helmet fits good and has some ventilation. It also comes with a snazzy visor you can remove if you desire. Leave it on to block the sun. I use glasses. My visors come off.

While we are on vents. This is one of the main reasons helmets cost more money. The more advance the venting system, the more "pulls" it takes for the mold to make them. Each direction and different shape requires another "pull" from the mold. The more advanced the mold, the more it costs to make it. Also, while helmets are being made, there is always bad ones being made, and there is a higher chance of a bad helmet being produced when there is more going on during the manufacturing. Once again making the helmet cost more money. You can see with the Bontrager Circuit, Bell Volt, and Giro Aeon, the venting systems are much better.

Bontrager Circuit has large vents. No crock pot here.
Depending how much you ride, how often you ride, and your budget usually will dictate how much to spend on your helmet. Do not buy anything that doesn't fit well. If if is uncomfortable, you won't want to wear it. Spending the extra bucks to get a better fit is worth it.

Bell Volt
Giro Aeon

The Bell Volt has quite a bit of light shining through there. The Giro Aeon an amazing helmet. Lots of venting and very little weight. These two helmets are getting up there in price. But when it comes to fit, ventilation, and styling. They are hard to beat.

All the helmet we have been talking about so far are what is called a "single impact helmet". These helmets are designed for one impact. The foam that makes them up is harder then another type of helmet called "multiple impact helmets". These are the "skater" or BMX styled helmets. While you should replace your single impact helmet after a accident or even dropping it on concrete, the multiple impact helmet is designed to take more abuse. The trade off is there is more helmet on your head. They are designed to take impacts from all around your head. They also offer some fancy styling options not found on other cycling helmets.

Bell Faction helmets are all fancy and look pretty sweet with the BMX bike paint jobs.

Bell Faction vents. Kinda. You will look cool, but be warm.
Do you have to ride a BMX bike or fixed gear to wear one of these. Nope. Can you race cross in one?

Go Speed Go!
Yup. You will look like Speed Racer. But you will be hot doing it.

Which ever helmet you like the most, you will wear the most. Just wear one.

When it comes to wearing one. The position of it on your head and the correct fit is essential.
First make sure the straps aren't all twisted up when you are putting it on your head.


Helmet strap twisted. Will not fit correctly on your head.
Helmet straps nice and flat. Will fit good.


Now that the straps are ready, put Mr. Helmet on your head. Place it so the front of the helmet is level to the ground. Not on the back of your head. Helmet retention system goes on towards the back.

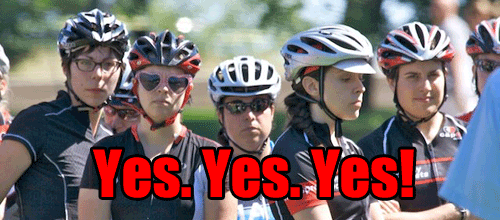
No. No. and No.


The ladies of the Chicago Cross Cup take helmets very serious.

 Once it is on your head and level. You will need to tighten the retention system so the helmet is firmly on your head. It should be tight enough that when you move the helmet, your eyebrows move with it. If you don't have any eyebrows from your younger days as a pyro, use a sharpie of something else to draw them on for testing. A real pro would use a marker that matched his or her kit.

Next it is time to adjust your straps. You adjust the straps on the side of you head so that they fall under your ear.
Adjust these fellers so the straps are under your ear.
You will also be adjusting the fore and aft position of them at this time as well.

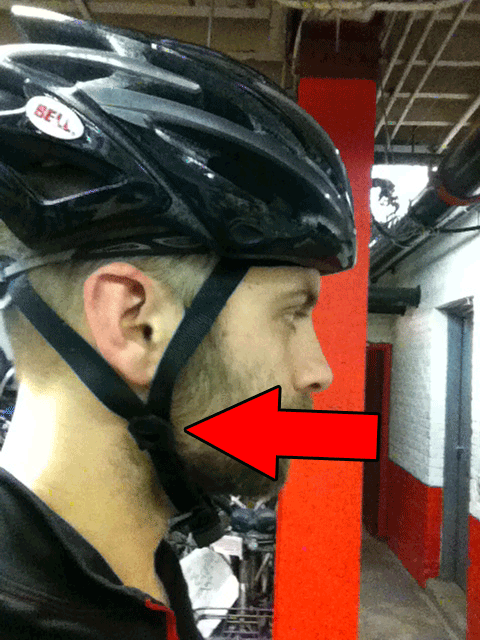
Once you have this all figured out. Time to adjust the buckle. These days helmets are held secure by the retention system. The strap under your chin does not have to be so tight you can't move your jaw. It needs to be tight enough that the strap does not come over your chin while buckled.

Chin strap. Not flapping over.

Helmets can also get old. The foam starts to age from the minute it comes out of its mold. The rule of thumb for helmet age is, that you lose about 10% of the helmets effectiveness each year it is alive. After 5 years, the helmet is half dead, and should be replaced. Otherwise the foam could be less effective and you could end up half dead. Or even all the way dead.
Helmets with damage to them like cracks or busted straps should also be replaced.
Good news is, most helmet manufactures have crash replacement prices available for their product.
If you crashed in a helmet you like, you can get it replaced for a discounted price.
Boom.

Children's helmets a go go!

 Don't forget your children need helmets too. There are many styles available for the little ones too.
Bell Fraction. Staying stylish on little heads.
Even fancy BMX helmets from Bell called the Fraction.

That is all for now. More helmet info to come. But what ever you do.

WEAR A HELMET!

And chastise those who don't. It saved my girlfriends life. I am quite glad she wears one.

Wet Train Tracks and Your Bicycle

The other day I was riding in the rain, and came across one of my least favorite obstacles while commuting:

Wet train tracks running at an angle to the street and my direction.

Even though I cross them often, when they are wet, they still deserve respect. I know quite a few people who have learned the hard way that wet tracks can bring you down with the quickness.

Here are a few of my suggestions on how to handle them.

First and foremost, if you find yourself in a situation with a rough crossing or are nervous about a busy crossing near cars. There is no shame in walking your bike. Play it safe until you build up your bike ninja skills and confidence on your wheels. The fall isn't the worst part. It's landing in a slush puddle in the winter or having the car tailgating you almost run you over.

That being said, here is how to roll over those slippery suckers.

Come at the tracks at as close to a right angle as possible. The masterpiece below shows what I am talking about. The red lines is the path of the bike.


After you have your path picked out. You need to reduce your speed to your comfort level before getting to the tracks. Be aware the area around the train tracks is also quite slippery. And the road way before them will have oil on the ground from when cars are waiting for the trains to go by. Roads with oil are most slippery with just a light bit of rain on top of them. Keep this in mind when choosing your speed and when to start braking to reduce it.


So you have your approach all ready. Now it is time to roll over them bad dogs. You want your weight distributed evenly over your bike. Meaning not all your weight on your seat. Distribute it evenly over your hands, feet, and booty. Stay loose, but maintain a fir, grip on your bars. Not a death grip, but you want to hold your bars to keep them from spinning if the tire hits something at a funny angle.

When you are crossing the tracks and the crossing matting, you can coast if it makes you feel more comfortable as you roll over to the other side.

Done and done. Easy as pie. Piece of cake.

Somethings to keep in mind are:

The rear wheel tracks on a different path then the front wheel, so give yourself space to get both wheels 90 degrees to the tracks. See below. The blue line is the rear tire.Roughly. And I do mean roughly.


If you don't have the room to achieve an angle that makes you feel safe, SLOW DOWN, and pedal over the tracks nice and easy.

Walking over them is better than falling on them.

Wear a helmet and gloves. Keep your head safe at all times. Always wear a helmet. And if you do fall, the first thing people tend to do is put their hands out. If you don't have gloves on, you may end up with a palm full of broken glass and gravel. Ouch.

Check your tires. Keep your pressure maintained and watch for excessive wear. The siping (the tread on road or hybrid tires that is cut into the tire, not knobs that come out of the tire like off-road tires) in the tread of the tire along with the rubber compounds of the tire work to help keep you upright.


Friday, December 23, 2011

Holiday Photo Caption Contest

Would you like to win a code worth $50 towards anything on our website?

If you do, head over to our Facebook page and put your best caption forward.

Get the most likes on your comment by January 4th at noon, and win the code.

Here is the link to the contest page


http://www.facebook.com/photo.php?fbid=10150415935727237&set=a.298867207236.154463.43751817236&type=1&theater

Get your captions ready, and go post.

Tuesday, December 20, 2011

Disc Brake 101 & Disc Brake Bed In Procedure

Things you should know about disc brakes.


* Do not squeeze hydraulic brake levers while

the wheel / rotor is not in the bike.

Doing so may result in having to have your

pistons inside the brake caliper reset.

This may include re-bleeding the brake

system.


* Disc brakes make some noise. There is only

a millimeter or so spacing on each side of the

brake caliper. During your ride, as the wheel

flexes the rotor will contact the brake pad

and make a zinging noise. Other noises, such

as squealing may be dirty rotors,

contaminated pads, or damaged rotors.

If you are unsure, please feel free to ask our

service department for help.


* Do not use spray lubricants on your chain.

The over spray may land on your rotors and

contaminate your brake system. Only use

isopropyl alcohol to clean your rotors.


* NOTE: While disc brakes work wonderfully

even in extreme conditions, it's still important

to keep them in tip-top shape. Different

types of discs may require specific

maintenance not covered here.


Disc brake pad & rotor bed in procedure


All new brake pads and rotors should be put through

a wear-in process called ‘bed-in’. The bed-in procedure,

which should be performed prior to your first ride,

ensures the most consistent and powerful braking

feel, along with the quietest braking in most riding

conditions. The bed-in process heats up the brake

pads and rotors, which deposits an even layer of

brake pad material (transfer layer) to the braking

surface of the rotor. It is this transfer layer that

optimizes braking performance.

Warning!

The bed-in process requires you to perform heavy

braking. You must be familiar with the power and

operation of disc brakes. Braking heavily when not

familiar with the power and operation of disc brakes

could cause you to lose control of your bicycle. This

could lead to a crash, serious injury, and even death.


If you are unfamiliar with the power and operation

of disc brakes, you should have the bed-in process

performed by a qualified bicycle mechanic.

Important!

Do not lock up the wheels at any point during the

bed-in procedure


To safely achieve optimal results, remain seated on

the bike during the entire bed-in procedure.


1. Accelerate the bicycle to a moderate speed, then

firmly apply the brakes until you are at walking

speed. Repeat approximately twenty times.


2. Accelerate the bike to a faster speed. Then very

firmly apply the brakes until you are at walking

speed. Repeat approximately ten times.


Important!
 
3. Allow the brakes to cool prior to any additional riding.

For more information on disc brakes. Check out our website.